
Use this hands-on test-drive checklist to evaluate comfort, steering, brakes, transmission behavior, visibility, tech, tire condition, and red flags before y...
Your brakes rarely fail out of nowhere. Most of the time, they send little warnings for weeks, sometimes months, before things get sketchy. The trick is knowing what you are looking at and how to check it safely.
This guide walks you through a simple at-home inspection of your brake pads and rotors using your eyes, a flashlight, and a little patience. No scan tools, no mystery jargon, no sales pitch. Just a clean visual check you can do in the driveway.
Quick note: This is mainly for disc brakes. If your vehicle has rear drum brakes, the inspection process is different because the shoes and hardware sit inside the drum.
Safety first
I know it is tempting to take a quick peek and call it good. But brakes are not the place to cut corners. Do this right:
- Work on flat ground, not a sloped driveway.
- Set the parking brake and put the car in Park (automatic) or in gear (manual).
- Chock the wheels that stay on the ground.
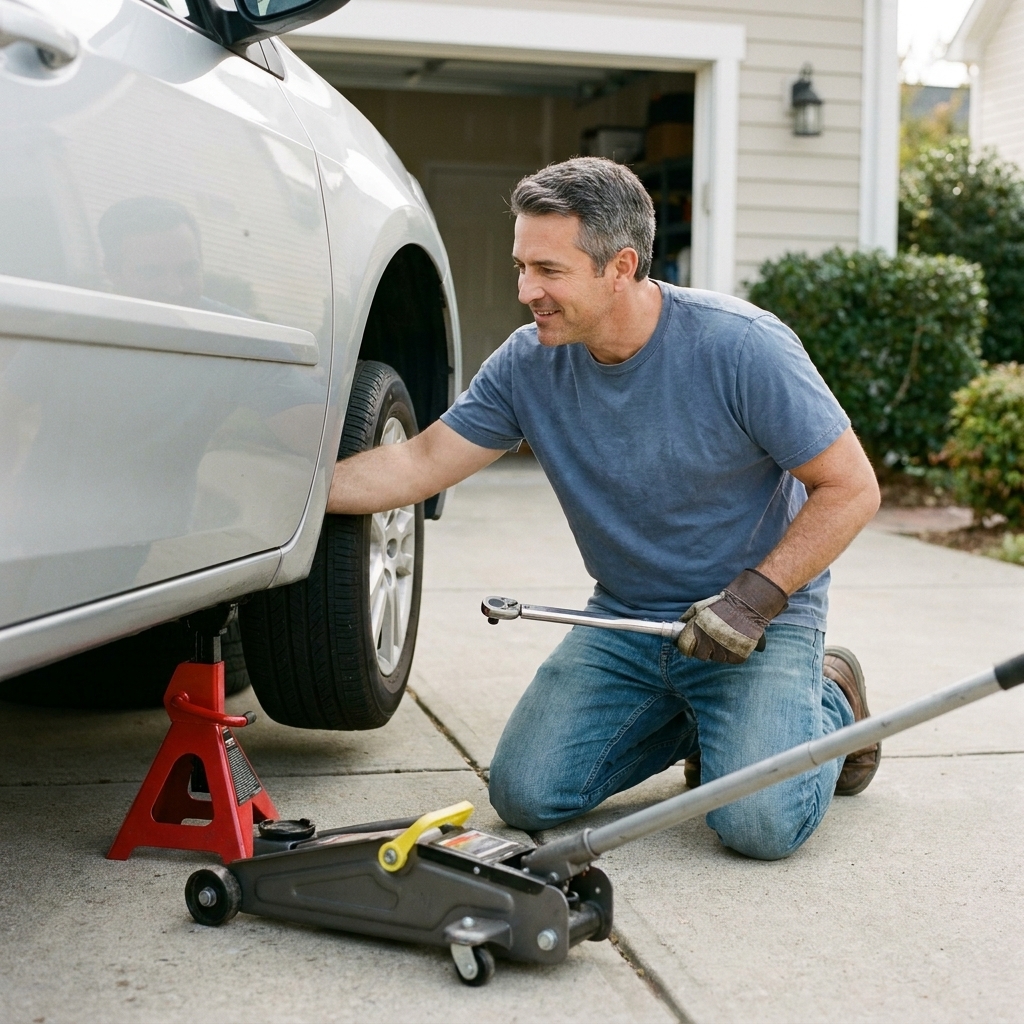
- Never get under a car supported only by a jack. If you lift it, support it with jack stands at the correct lift points.
- Let brakes cool if you just drove. Rotors get hot enough to burn skin fast.
- Wear eye protection. Brake dust and rust flakes love falling straight down.
If you see brake fluid leaks, a severely cracked rotor, or pads worn to metal, skip driving and schedule service or tow it. That is not “one more week” territory.
Tools that make this easy
- Flashlight or headlamp
- Gloves
- Phone camera (seriously helpful for zooming in)
- Thin ruler or tape measure (optional)
- Floor jack and jack stands (if you plan to remove wheels)
- Lug wrench (if removing wheels)
Quick check without removing the wheels
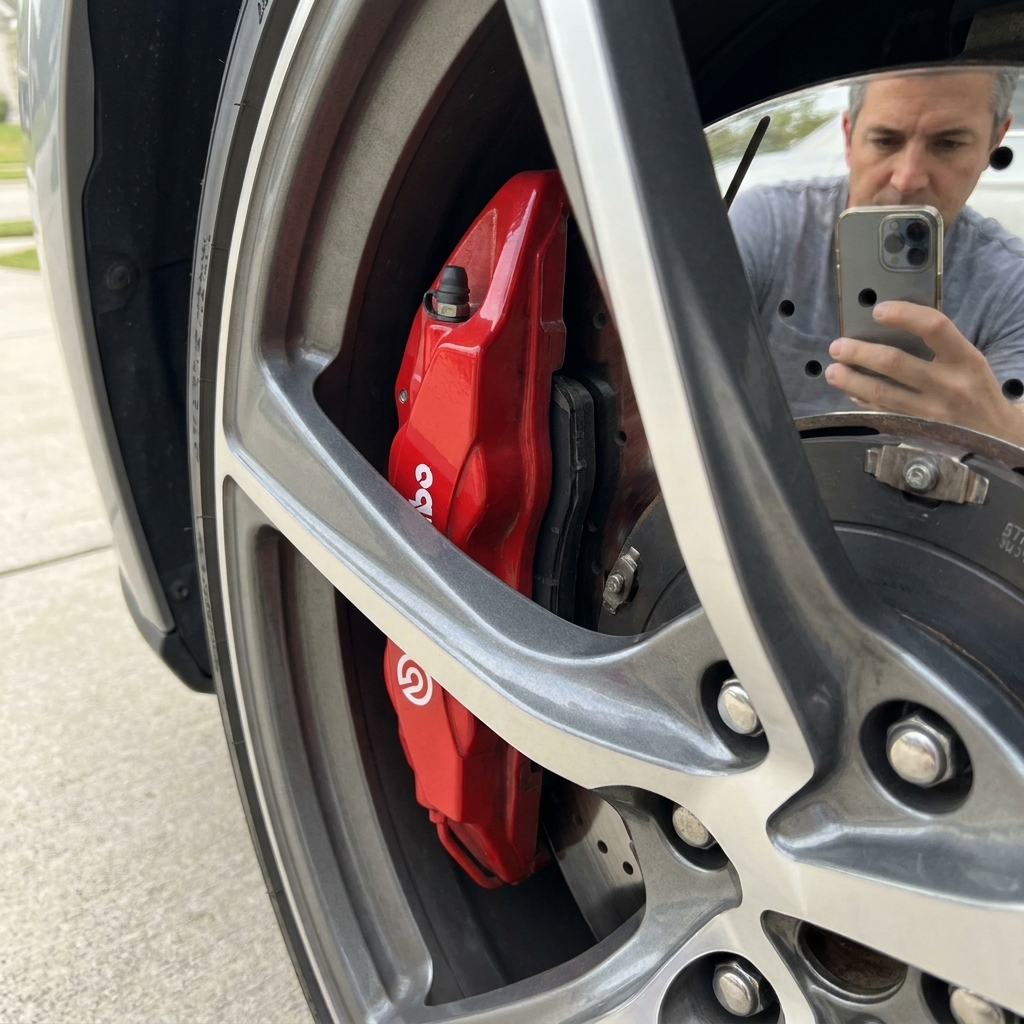
On many cars, you can see the outer brake pad and a good chunk of the rotor through the wheel spokes. This is a great first pass and it takes a few minutes per corner.
Step 1: Turn the steering for access
For the front brakes, turn the steering wheel to full lock so you can see behind the wheel more clearly. Full lock left gives you better access to the right-front brake. Full lock right gives you better access to the left-front brake.
Step 2: Find the rotor and caliper
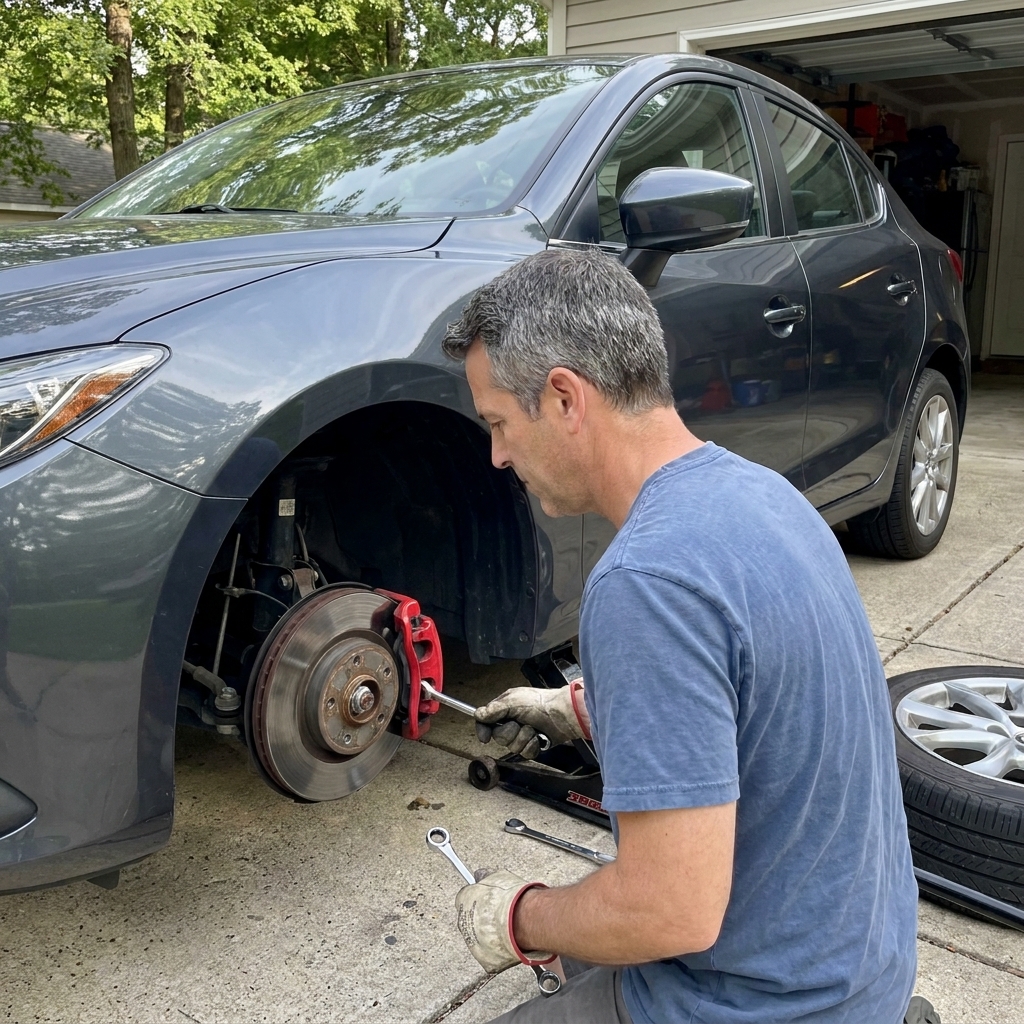
The rotor is the flat, shiny disc. The caliper is the clamp-shaped part that sits over the rotor. The brake pad is inside the caliper, pressing against the rotor when you hit the brake.
Step 3: Estimate pad thickness
You are looking at the friction material, not the metal backing plate. If what you see looks thinner than a few millimeters, plan on pads soon.
- Comfort zone: roughly 6 mm or more of friction material.
- Start planning: around 4 mm.
- Replace soon: around 3 mm.
- Replace now: 2 mm or less, or if you can see metal-to-metal contact.
These are practical rules of thumb for a visual check, not a universal spec. Some manufacturers and pad designs treat 3 mm as “replace now,” and wear indicators can make noise earlier depending on how the pad is built. If you are unsure, move to the wheel-off inspection below.
Step 4: Check for rotor damage
Even through the wheel, you can spot big red flags:
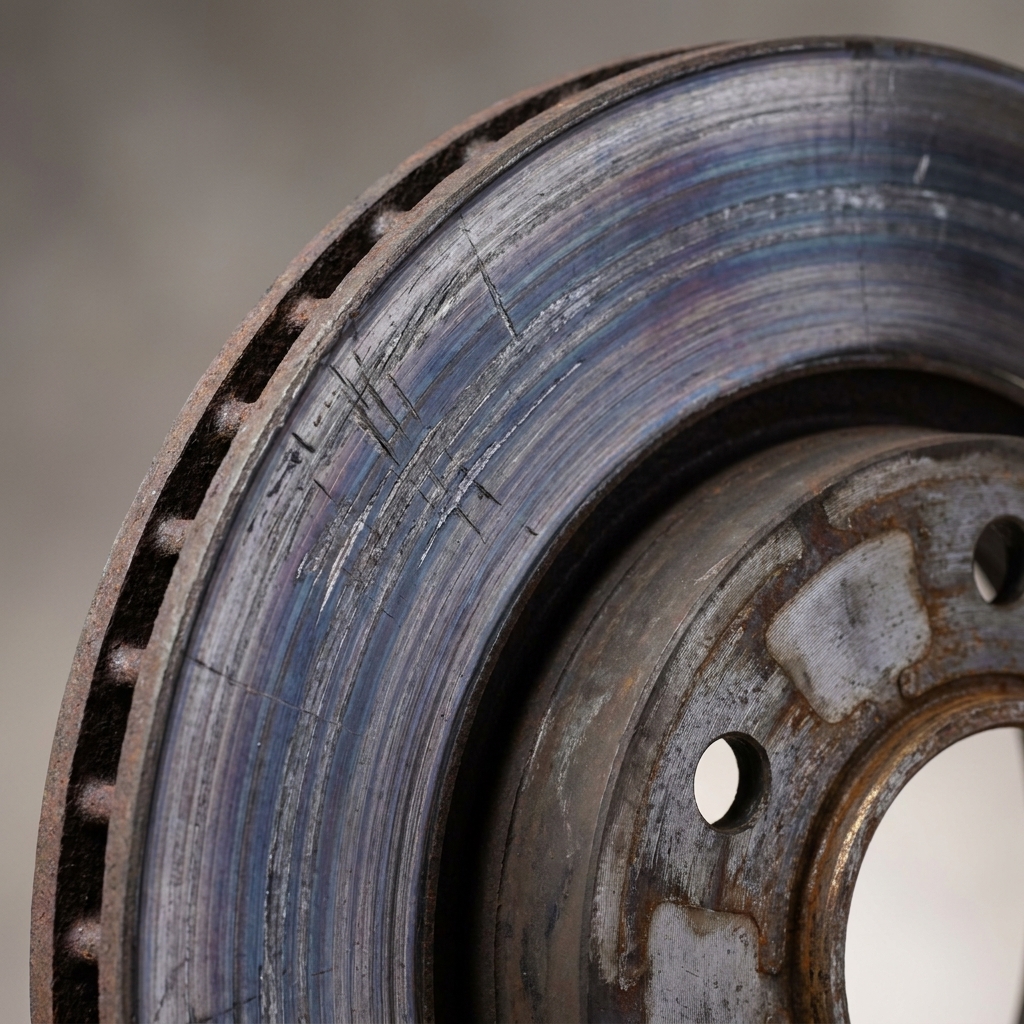
- Deep grooves you can clearly see.
- Blue or purple heat spots (signs of overheating).
- Heavy rust ridges around the outer edge.
- Cracks radiating across the braking surface (rare, but serious).
Also watch your dash: Some vehicles have electronic pad-wear sensors. A brake warning message or wear warning light can be a sign pads are low, but it can also point to a sensor or wiring issue. Either way, it is your cue to inspect.
Better inspection with the wheel off
If you want a confident answer, pull the wheel. You do not have to remove the caliper for a basic visual inspection, and you will learn a lot just by getting eyes on the parts.
Step 1: Loosen lug nuts first
Break the lug nuts loose about a quarter turn while the tire is still on the ground. Do not remove them yet.
Step 2: Lift and support the car
Jack the vehicle at the proper lift point and set it down on a jack stand. Give the car a gentle shake. If it feels unstable, lower it and reset your support points.
Step 3: Remove the wheel
Now remove the lug nuts and wheel. Slide the wheel under the car as a secondary safety buffer, but still keep the car on jack stands.
How to inspect brake pads
Inner vs outer pad
Disc brakes have two pads per wheel: an outer pad (the one you can usually see) and an inner pad (facing the inside of the car). The inner pad often wears faster, especially if a caliper slide is sticking, so do not only check the outer pad and call it a day.
What good looks like
- Friction material is evenly thick across the pad.
- No chunks missing, no crumbling edges.
- Wear looks similar on inner and outer pads.
Warning signs
- Very thin friction material (a sliver of pad left).
- Uneven wear (tapered pad, thicker on one end than the other).
- Inner pad much thinner than outer pad (often sticking slide pins or caliper issues).
- Glazing (shiny, glassy-looking surface), sometimes tied to overheating or light braking habits.
- Contamination (wet or oily pad), usually from a leak. Contaminated pads should be replaced, not “cleaned.”
Tip from the shop: Use your phone camera with the flash on and zoom in. You can often get a clear look at the inner pad by aiming through the caliper opening.
How to inspect rotors
Your rotor is the “track” the pad squeezes on. A rotor can look fine at a glance but still be too thin or have runout, and confirming that requires measuring tools. But visually, you can still catch a lot.
One important limit you cannot eyeball: Minimum rotor thickness. Many rotors have the minimum thickness stamped on the rotor hat, and it is also listed in service information. If a rotor is at or below minimum, it needs replacement even if it looks decent.
Normal wear
- A smooth surface with light, shallow circular marks.
- A small outer edge ridge is common, especially as pads wear.
- Light surface rust after rain that wipes off after a few stops is normal.
Red flags
- Deep grooves you can hook a fingernail in.
- Cracks across the braking surface.
- Heavy scoring plus a loud scraping sound when braking (often pad-to-metal).
- Blue or purple discoloration (overheating), sometimes paired with a burning smell after driving.
- Rust pitting in the braking area that does not clean up after a short drive, common on cars that sit.
- Uneven contact where part of the rotor face looks unused, which can happen with seized calipers, wrong pads, or corrosion.
Feel clues that matter
Your eyes are only one part of the story. These symptoms help you connect what you see to what you feel behind the wheel:
- Squealing: often a wear indicator tab, glazed pads, or cheap pad material. Not always urgent, but it is a prompt to inspect.
- Grinding: usually pads worn to metal. Stop driving and inspect immediately.
- Pulsation in the pedal: commonly rotor thickness variation or deposits. People call it “warped rotors,” but the fix still often involves rotor resurfacing or replacement depending on condition.
- Pulling to one side while braking: can be a sticking caliper, uneven pad material, or tire issues. If you see uneven pad wear side-to-side, take it seriously.
- Soft pedal: not a pad issue. Think air in the brake lines, fluid leak, or hydraulic problems. That is a safety item right now.
How often to check
For most daily drivers, a quick visual check every oil change is a good habit. Check sooner if you notice new noises, vibration, longer stopping distances, or if you drive in conditions that are hard on brakes like mountains, heavy city traffic, towing, or lots of stop-and-go delivery style driving.
If your car sits for long stretches, check rotors for rust pitting and pads for uneven wear. Sitting can be just as hard on brakes as driving.
What to do if you find wear
Low pads, rotors look decent
Plan a pad replacement soon. On many modern vehicles, replacing pads without addressing rotor condition is a gamble. Some rotors can be resurfaced, many are replaced due to minimum thickness limits, runout concerns, or rust.
Grooved, cracked, or heat-spotted rotors
Expect to replace rotors (and pads). Cracks are an immediate no-go. Deep grooves and heat spots usually mean you will not get quiet, smooth braking with pads alone.
Uneven wear
Uneven pad wear is often a “hardware” problem, not just a pad problem. You may be looking at:
- Sticking caliper slide pins
- Seized caliper piston
- Improperly installed hardware
- Collapsed brake hose (less common, but it happens)
If you are not comfortable diagnosing that, this is the point where a reputable shop earns its keep. The goal is to fix the cause so you are not buying pads twice.
Common questions
Can I inspect brakes without taking the wheel off?
Often, yes, especially the front brakes with open-spoke wheels. It is a solid quick check, but it does not always show the inner pad well. If you want a confident answer, pull the wheel.
How thin is too thin for brake pads?
As a practical rule, 3 mm is “replace soon” and 2 mm is “replace now.” Some vehicles and pad designs treat 3 mm as replacement time, especially if wear indicators are close to contacting. If you see metal-to-metal contact or hear grinding, do not drive it.
Is a ridge on the rotor normal?
A small ridge on the outer edge is common. A big ridge plus deep grooves across the rotor face points to rotor wear that may require replacement.
Why are my rear pads wearing faster than the fronts?
It can be normal on some modern cars because electronic brake distribution and stability control can lean on the rear brakes more than people expect. But faster rear wear can also come down to rear caliper design (especially integrated parking brake mechanisms), pad compound, driving style, or sticking hardware. The key is that wear should still look even left-to-right and inner-to-outer.
Should I replace pads and rotors together?
Not always, but it is common. If rotors are grooved, heat-spotted, heavily rusted, below minimum thickness, or prone to pulsation, replacing them with the pads is the right move for smooth, quiet braking and proper bed-in.
Final checklist
- Pad friction material is not down near the backing plate
- Inner and outer pads look similar in thickness
- Rotor face is smooth with no deep grooves or cracks
- No wetness around the caliper or brake hose (possible fluid leak)
- No obvious hardware missing or loose
Once you reinstall the wheel, hand-thread lug nuts first, snug them in a star pattern, then torque them to spec when the tire is back on the ground. If you are not sure of the torque spec, check your owner’s manual or a factory service source. Over-tightened or unevenly torqued lugs can contribute to brake pulsation and rotor runout issues, so the torque wrench matters.
If you removed a wheel and rotated parts by hand or pressed on the caliper, do a quick safety routine before you roll: pump the brake pedal until it feels firm, then do a slow test stop in a safe area.
A careful inspection now beats a surprise later. If anything looks questionable or the car does not feel right under braking, treat it like the safety item it is and get it checked before your next long drive.